270 lines
15 KiB
Markdown
270 lines
15 KiB
Markdown
|
|
# audio_service
|
||
|
|
|
||
|
|
This plugin wraps around your existing audio code to allow it to run in the background or with the screen turned off, and allows your app to interact with headset buttons, the Android lock screen and notification, iOS control center, wearables and Android Auto. It is suitable for:
|
||
|
|
|
||
|
|
* Music players
|
||
|
|
* Text-to-speech readers
|
||
|
|
* Podcast players
|
||
|
|
* Navigators
|
||
|
|
* More!
|
||
|
|
|
||
|
|
## How does this plugin work?
|
||
|
|
|
||
|
|
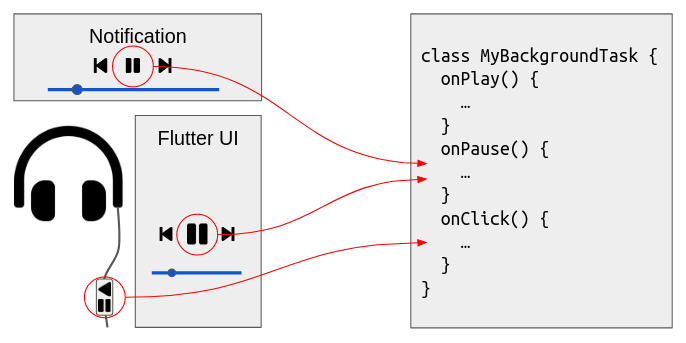
You encapsulate your audio code in a background task which runs in a special isolate that continues to run when your UI is absent. Your background task implements callbacks to respond to playback requests coming from your Flutter UI, headset buttons, the lock screen, notification, iOS control center, car displays and smart watches:
|
||
|
|
|
||
|
|
|
||
|
|
|
||
|
|
You can implement these callbacks to play any sort of audio that is appropriate for your app, such as music files or streams, audio assets, text to speech, synthesised audio, or combinations of these.
|
||
|
|
|
||
|
|
| Feature | Android | iOS | macOS | Web |
|
||
|
|
| ------- | :-------: | :-----: | :-----: | :-----: |
|
||
|
|
| background audio | ✅ | ✅ | ✅ | ✅ |
|
||
|
|
| headset clicks | ✅ | ✅ | ✅ | ✅ |
|
||
|
|
| start/stop/play/pause/seek/rate | ✅ | ✅ | ✅ | ✅ |
|
||
|
|
| fast forward/rewind | ✅ | ✅ | ✅ | ✅ |
|
||
|
|
| repeat/shuffle mode | ✅ | ✅ | ✅ | ✅ |
|
||
|
|
| queue manipulation, skip next/prev | ✅ | ✅ | ✅ | ✅ |
|
||
|
|
| custom actions | ✅ | ✅ | ✅ | ✅ |
|
||
|
|
| custom events | ✅ | ✅ | ✅ | ✅ |
|
||
|
|
| notifications/control center | ✅ | ✅ | ✅ | ✅ |
|
||
|
|
| lock screen controls | ✅ | ✅ | | ✅ |
|
||
|
|
| album art | ✅ | ✅ | ✅ | ✅ |
|
||
|
|
| Android Auto, Apple CarPlay | (untested) | ✅ | | |
|
||
|
|
|
||
|
|
If you'd like to help with any missing features, please join us on the [GitHub issues page](https://github.com/ryanheise/audio_service/issues).
|
||
|
|
|
||
|
|
## Migrating to 0.14.0
|
||
|
|
|
||
|
|
Audio focus, interruptions (e.g. phone calls), mixing, ducking and the configuration of your app's audio category and attributes, are now handled by the [audio_session](https://pub.dev/packages/audio_session) package. Read the [Migration Guide](https://github.com/ryanheise/audio_service/wiki/Migration-Guide#0140) for details.
|
||
|
|
|
||
|
|
## Can I make use of other plugins within the background audio task?
|
||
|
|
|
||
|
|
Yes! `audio_service` is designed to let you implement the audio logic however you want, using whatever plugins you want. You can use your favourite audio plugins such as [just_audio](https://pub.dartlang.org/packages/just_audio), [flutter_radio](https://pub.dev/packages/flutter_radio), [flutter_tts](https://pub.dartlang.org/packages/flutter_tts), and others, within your background audio task. There are also plugins like [just_audio_service](https://github.com/yringler/just_audio_service) that provide default implementations of `BackgroundAudioTask` to make your job easier.
|
||
|
|
|
||
|
|
Note that this plugin will not work with other audio plugins that overlap in responsibility with this plugin (i.e. background audio, iOS control center, Android notifications, lock screen, headset buttons, etc.)
|
||
|
|
|
||
|
|
## Example
|
||
|
|
|
||
|
|
### Background code
|
||
|
|
|
||
|
|
Your audio code will run in a special background isolate, separate and detachable from your app's UI. To achieve this, define a subclass of `BackgroundAudioTask` that overrides a set of callbacks to respond to client requests:
|
||
|
|
|
||
|
|
```dart
|
||
|
|
class MyBackgroundTask extends BackgroundAudioTask {
|
||
|
|
// Initialise your audio task.
|
||
|
|
onStart(Map<String, dynamic> params) {}
|
||
|
|
// Handle a request to stop audio and finish the task.
|
||
|
|
onStop() async {}
|
||
|
|
// Handle a request to play audio.
|
||
|
|
onPlay() {}
|
||
|
|
// Handle a request to pause audio.
|
||
|
|
onPause() {}
|
||
|
|
// Handle a headset button click (play/pause, skip next/prev).
|
||
|
|
onClick(MediaButton button) {}
|
||
|
|
// Handle a request to skip to the next queue item.
|
||
|
|
onSkipToNext() {}
|
||
|
|
// Handle a request to skip to the previous queue item.
|
||
|
|
onSkipToPrevious() {}
|
||
|
|
// Handle a request to seek to a position.
|
||
|
|
onSeekTo(Duration position) {}
|
||
|
|
}
|
||
|
|
```
|
||
|
|
|
||
|
|
You can implement these (and other) callbacks to play any type of audio depending on the requirements of your app. For example, if you are building a podcast player, you may have code such as the following:
|
||
|
|
|
||
|
|
```dart
|
||
|
|
import 'package:just_audio/just_audio.dart';
|
||
|
|
class PodcastBackgroundTask extends BackgroundAudioTask {
|
||
|
|
AudioPlayer _player = AudioPlayer();
|
||
|
|
onPlay() async {
|
||
|
|
_player.play();
|
||
|
|
// Show the media notification, and let all clients know what
|
||
|
|
// playback state and media item to display.
|
||
|
|
await AudioServiceBackground.setState(playing: true, ...);
|
||
|
|
await AudioServiceBackground.setMediaItem(MediaItem(title: "Hey Jude", ...))
|
||
|
|
}
|
||
|
|
```
|
||
|
|
|
||
|
|
If you are instead building a text-to-speech reader, you may have code such as the following:
|
||
|
|
|
||
|
|
```dart
|
||
|
|
import 'package:flutter_tts/flutter_tts.dart';
|
||
|
|
class ReaderBackgroundTask extends BackgroundAudioTask {
|
||
|
|
FlutterTts _tts = FlutterTts();
|
||
|
|
String article;
|
||
|
|
onPlay() async {
|
||
|
|
_tts.speak(article);
|
||
|
|
// Show the media notification, and let all clients know what
|
||
|
|
// playback state and media item to display.
|
||
|
|
await AudioServiceBackground.setState(playing: true, ...);
|
||
|
|
await AudioServiceBackground.setMediaItem(MediaItem(album: "Business Insider", ...))
|
||
|
|
}
|
||
|
|
}
|
||
|
|
```
|
||
|
|
|
||
|
|
There are several methods in the `AudioServiceBackground` class that are made available to your background audio task to allow it to communicate to clients outside the isolate, such as your Flutter UI (if present), the iOS control center, the Android notification and lock screen. These are:
|
||
|
|
|
||
|
|
* `AudioServiceBackground.setState` broadcasts the current playback state to all clients. This includes whether or not audio is playing, but also whether audio is buffering, the current playback position and buffer position, the current playback speed, and the set of audio controls that should be made available. When you broadcast this information to all clients, it allows them to update their user interfaces to show the appropriate set of buttons, and show the correct audio position on seek bars, for example. It is important for you to call this method whenever any of these pieces of state changes. You will typically want to call this method from your `onStart`, `onPlay`, `onPause`, `onSkipToNext`, `onSkipToPrevious` and `onStop` callbacks.
|
||
|
|
* `AudioServiceBackground.setMediaItem` broadcasts the currently playing media item to all clients. This includes the track title, artist, genre, duration, any artwork to display, and other information. When you broadcast this information to all clients, it allows them to update their user interface accordingly so that it is displayed on the lock screen, the notification, and in your Flutter UI (if present). You will typically want to call this method from your `onStart`, `onSkipToNext` and `onSkipToPrevious` callbacks.
|
||
|
|
* `AudioServiceBackground.setQueue` broadcasts the current queue to all clients. Some clients like Android Auto may display this information in their user interfaces. You will typically want to call this method from your `onStart` callback. Other callbacks exist where it may be appropriate to call this method such as `onAddQueueItem` and `onRemoveQueueItem`.
|
||
|
|
|
||
|
|
### UI code
|
||
|
|
|
||
|
|
Connecting to `AudioService`:
|
||
|
|
|
||
|
|
```dart
|
||
|
|
// Wrap your "/" route's widget tree in an AudioServiceWidget:
|
||
|
|
return MaterialApp(
|
||
|
|
home: AudioServiceWidget(MainScreen()),
|
||
|
|
);
|
||
|
|
```
|
||
|
|
|
||
|
|
Starting your background audio task:
|
||
|
|
|
||
|
|
```dart
|
||
|
|
await AudioService.start(
|
||
|
|
backgroundTaskEntrypoint: _myEntrypoint,
|
||
|
|
androidNotificationIcon: 'mipmap/ic_launcher',
|
||
|
|
// An example of passing custom parameters.
|
||
|
|
// These will be passed through to your `onStart` callback.
|
||
|
|
params: {'url': 'https://somewhere.com/sometrack.mp3'},
|
||
|
|
);
|
||
|
|
// this must be a top-level function
|
||
|
|
void _myEntrypoint() => AudioServiceBackground.run(() => MyBackgroundTask());
|
||
|
|
```
|
||
|
|
|
||
|
|
Sending messages to it:
|
||
|
|
|
||
|
|
* `AudioService.play()`
|
||
|
|
* `AudioService.pause()`
|
||
|
|
* `AudioService.click()`
|
||
|
|
* `AudioService.skipToNext()`
|
||
|
|
* `AudioService.skipToPrevious()`
|
||
|
|
* `AudioService.seekTo(Duration(seconds: 53))`
|
||
|
|
|
||
|
|
Shutting it down:
|
||
|
|
|
||
|
|
```dart
|
||
|
|
// This will pass through to your `onStop` callback.
|
||
|
|
AudioService.stop();
|
||
|
|
```
|
||
|
|
|
||
|
|
Reacting to state changes:
|
||
|
|
|
||
|
|
* `AudioService.playbackStateStream` (e.g. playing/paused, buffering/ready)
|
||
|
|
* `AudioService.currentMediaItemStream` (metadata about the currently playing media item)
|
||
|
|
* `AudioService.queueStream` (the current queue/playlist)
|
||
|
|
|
||
|
|
Keep in mind that your UI and background task run in separate isolates and do not share memory. The only way they communicate is via message passing. Your Flutter UI will only use the `AudioService` API to communicate with the background task, while your background task will only use the `AudioServiceBackground` API to interact with the clients, which include the Flutter UI.
|
||
|
|
|
||
|
|
### Connecting to `AudioService` from the background
|
||
|
|
|
||
|
|
You can also send messages to your background audio task from another background callback (e.g. android_alarm_manager) by manually connecting to it:
|
||
|
|
|
||
|
|
```dart
|
||
|
|
await AudioService.connect(); // Note: the "await" is necessary!
|
||
|
|
AudioService.play();
|
||
|
|
```
|
||
|
|
|
||
|
|
## Configuring the audio session
|
||
|
|
|
||
|
|
If your app uses audio, you should tell the operating system what kind of usage scenario your app has and how your app will interact with other audio apps on the device. Different audio apps often have unique requirements. For example, when a navigator app speaks driving instructions, a music player should duck its audio while a podcast player should pause its audio. Depending on which one of these three apps you are building, you will need to configure your app's audio settings and callbacks to appropriately handle these interactions.
|
||
|
|
|
||
|
|
Use the [audio_session](https://pub.dev/packages/audio_session) package to change the default audio session configuration for your app. E.g. for a podcast player, you may use:
|
||
|
|
|
||
|
|
```dart
|
||
|
|
final session = await AudioSession.instance;
|
||
|
|
await session.configure(AudioSessionConfiguration.speech());
|
||
|
|
```
|
||
|
|
|
||
|
|
Each time you invoke an audio plugin to play audio, that plugin will activate your app's shared audio session to inform the operating system that your app is actively playing audio. Depending on the configuration set above, this will also inform other audio apps to either stop playing audio, or possibly continue playing at a lower volume (i.e. ducking). You normally do not need to activate the audio session yourself, however if the audio plugin you use does not activate the audio session, you can activate it yourself:
|
||
|
|
|
||
|
|
```dart
|
||
|
|
// Activate the audio session before playing audio.
|
||
|
|
if (await session.setActive(true)) {
|
||
|
|
// Now play audio.
|
||
|
|
} else {
|
||
|
|
// The request was denied and the app should not play audio
|
||
|
|
}
|
||
|
|
```
|
||
|
|
|
||
|
|
When another app activates its audio session, it similarly may ask your app to pause or duck its audio. Once again, the particular audio plugin you use may automatically pause or duck audio when requested. However, if it does not, you can respond to these events yourself by listening to `session.interruptionEventStream`. Similarly, if the audio plugin doesn't handle unplugged headphone events, you can respond to these yourself by listening to `session.becomingNoisyEventStream`. For more information, consult the documentation for [audio_session](https://pub.dev/packages/audio_session).
|
||
|
|
|
||
|
|
Note: If your app uses a number of different audio plugins, e.g. for audio recording, or text to speech, or background audio, it is possible that those plugins may internally override each other's audio session settings since there is only a single audio session shared by your app. Therefore, it is recommended that you apply your own preferred configuration using audio_session after all other audio plugins have loaded. You may consider asking the developer of each audio plugin you use to provide an option to not overwrite these global settings and allow them be managed externally.
|
||
|
|
|
||
|
|
## Android setup
|
||
|
|
|
||
|
|
These instructions assume that your project follows the new project template introduced in Flutter 1.12. If your project was created prior to 1.12 and uses the old project structure, you can update your project to follow the [new project template](https://github.com/flutter/flutter/wiki/Upgrading-pre-1.12-Android-projects).
|
||
|
|
|
||
|
|
Additionally:
|
||
|
|
|
||
|
|
1. Edit your project's `AndroidManifest.xml` file to declare the permission to create a wake lock, and add component entries for the `<service>` and `<receiver>`:
|
||
|
|
|
||
|
|
```xml
|
||
|
|
<manifest ...>
|
||
|
|
<uses-permission android:name="android.permission.WAKE_LOCK"/>
|
||
|
|
<uses-permission android:name="android.permission.FOREGROUND_SERVICE"/>
|
||
|
|
|
||
|
|
<application ...>
|
||
|
|
|
||
|
|
...
|
||
|
|
|
||
|
|
<service android:name="com.ryanheise.audioservice.AudioService">
|
||
|
|
<intent-filter>
|
||
|
|
<action android:name="android.media.browse.MediaBrowserService" />
|
||
|
|
</intent-filter>
|
||
|
|
</service>
|
||
|
|
|
||
|
|
<receiver android:name="com.ryanheise.audioservice.MediaButtonReceiver" >
|
||
|
|
<intent-filter>
|
||
|
|
<action android:name="android.intent.action.MEDIA_BUTTON" />
|
||
|
|
</intent-filter>
|
||
|
|
</receiver>
|
||
|
|
</application>
|
||
|
|
</manifest>
|
||
|
|
```
|
||
|
|
|
||
|
|
2. Starting from Flutter 1.12, you will need to disable the `shrinkResources` setting in your `android/app/build.gradle` file, otherwise the icon resources used in the Android notification will be removed during the build:
|
||
|
|
|
||
|
|
```
|
||
|
|
android {
|
||
|
|
compileSdkVersion 28
|
||
|
|
|
||
|
|
...
|
||
|
|
|
||
|
|
buildTypes {
|
||
|
|
release {
|
||
|
|
signingConfig ...
|
||
|
|
shrinkResources false // ADD THIS LINE
|
||
|
|
}
|
||
|
|
}
|
||
|
|
}
|
||
|
|
```
|
||
|
|
|
||
|
|
## iOS setup
|
||
|
|
|
||
|
|
Insert this in your `Info.plist` file:
|
||
|
|
|
||
|
|
```
|
||
|
|
<key>UIBackgroundModes</key>
|
||
|
|
<array>
|
||
|
|
<string>audio</string>
|
||
|
|
</array>
|
||
|
|
```
|
||
|
|
|
||
|
|
The example project may be consulted for context.
|
||
|
|
|
||
|
|
## macOS setup
|
||
|
|
The minimum supported macOS version is 10.12.2 (though this could be changed with some work in the future).
|
||
|
|
Modify the platform line in `macos/Podfile` to look like the following:
|
||
|
|
```
|
||
|
|
platform :osx, '10.12.2'
|
||
|
|
```
|
||
|
|
|
||
|
|
# Where can I find more information?
|
||
|
|
|
||
|
|
* [Tutorial](https://github.com/ryanheise/audio_service/wiki/Tutorial): walks you through building a simple audio player while explaining the basic concepts.
|
||
|
|
* [Full example](https://github.com/ryanheise/audio_service/blob/master/example/lib/main.dart): The `example` subdirectory on GitHub demonstrates both music and text-to-speech use cases.
|
||
|
|
* [Frequently Asked Questions](https://github.com/ryanheise/audio_service/wiki/FAQ)
|
||
|
|
* [API documentation](https://pub.dev/documentation/audio_service/latest/audio_service/audio_service-library.html)
|