9.6 KiB
Installation
If you already have Magisk installed, it is strongly recommended to upgrade directly via the Magisk app using its "Direct Install" method. The following tutorial is only for the initial installation.
Getting Started
Before you start:
- This tutorial assumes you understand how to use
adbandfastboot - Your device's bootloader has to be unlocked
- If you plan to also install custom kernels, install it after Magisk
Download and install the latest Magisk app. We use the app to gather some information about your device. In the home screen, you should see this:
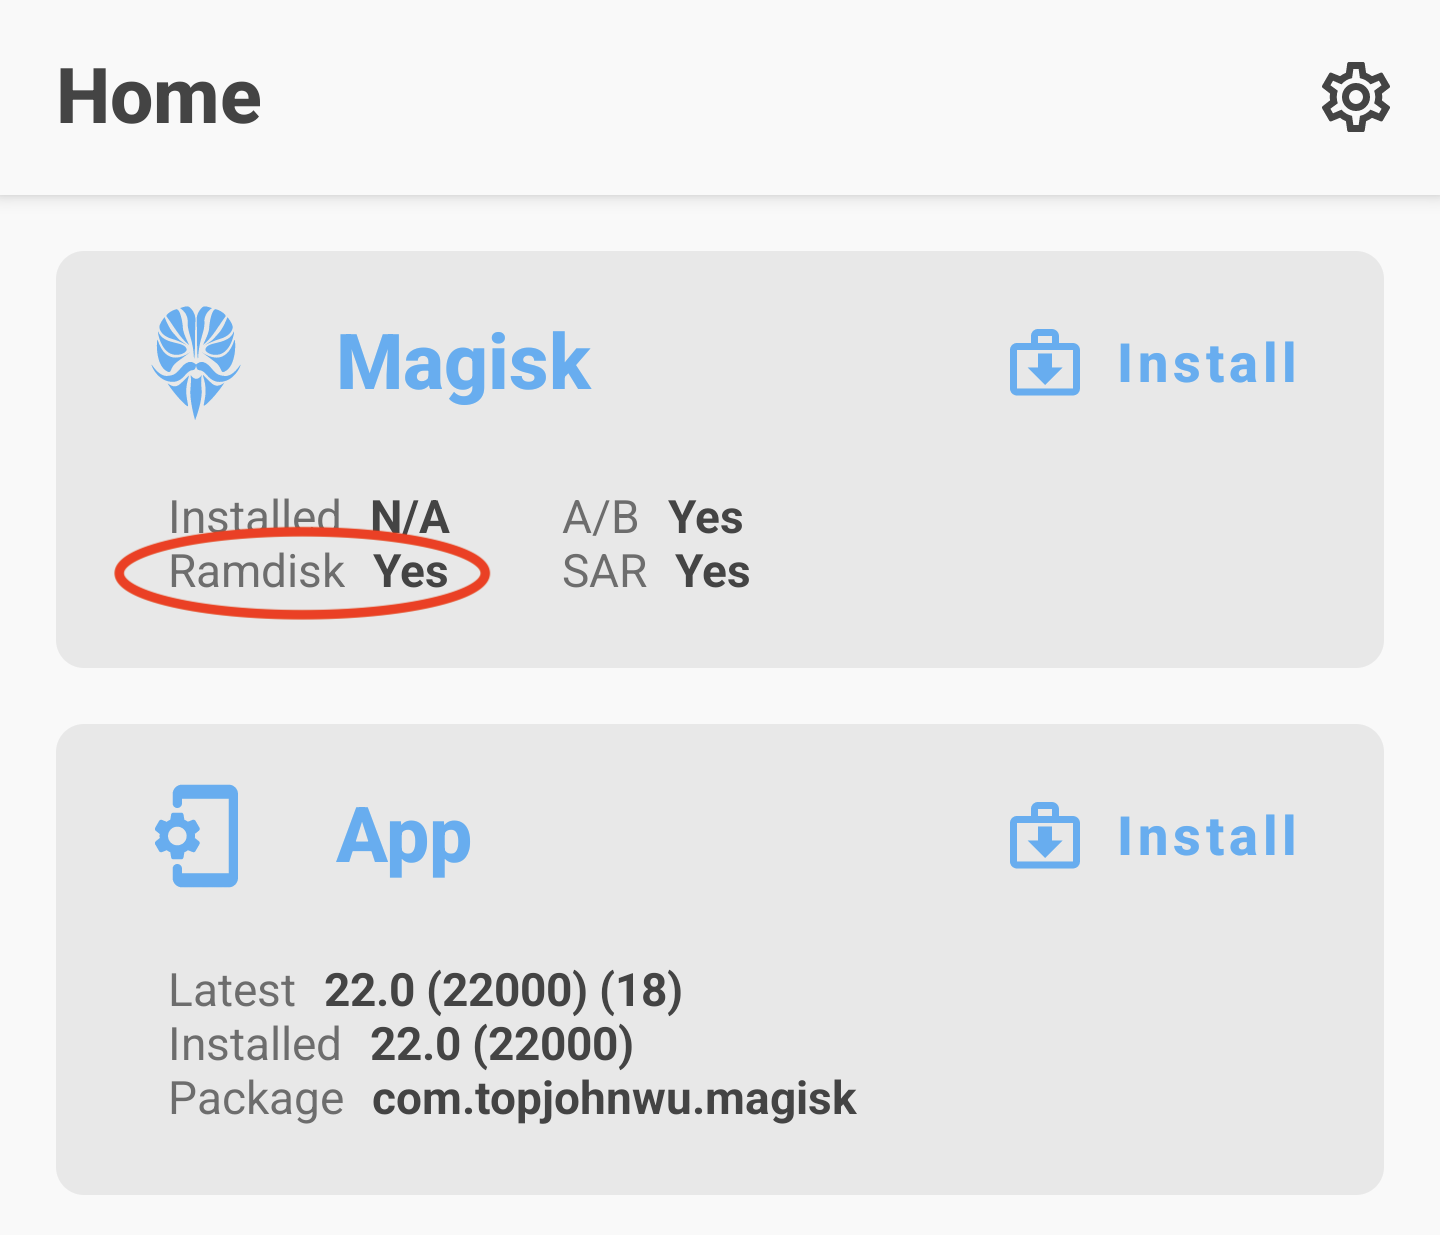
Pay special attention to the Ramdisk info. The result of this info determines whether your device has ramdisk in the boot partition.
(Unfortunately, there are exceptions as some devices' bootloader accepts ramdisk even if it shouldn't. In this case, you will have to follow the instructions as if your device's boot partition does include ramdisk. There is no way to detect this, so the only way to know for sure is to actually try. Fortunately, as far as we know, only some Xiaomi devices are known to have this property, so most people can simply ignore this piece of information.)
If your device does not have boot ramdisk, read the Magisk in Recovery section before installing. The information in that section is VERY important!
If you are using a Samsung device and the SAR result is Yes, please check its own section.
Otherwise, continue to Patching Images.
(P.S.1: If your device has boot ramdisk, you can also install Magisk with a custom recovery, but it is not recommended)
(P.S.2: Huawei devices are not supported, and the instructions are removed from this page.)
Patching Images
If your device has boot ramdisk, you need a copy of the boot.img
If your device does NOT have boot ramdisk, you need a copy of the recovery.img.
You should be able to extract the file you need from official firmware packages or your custom ROM zip (if using one). If you are still having trouble, go to XDA-Developers and look for resources, guides, discussions, or ask for help in your device's forum.
- Copy the boot/recovery image to your device
- Press the Install button in the Magisk card
- If you are patching a recovery image, make sure "Recovery Mode" is checked in options.
In most cases it should already be automatically checked. - Choose "Select and Patch a File" in method, and select the stock boot/recovery image
- The Magisk app will patch the image to
[Internal Storage]/Download/magisk_patched_[random_strings].img. - Copy the patched image to your PC with ADB:
adb pull /sdcard/Download/magisk_patched_[random_strings].img - Flash the patched boot/recovery image to your device.
For most devices, reboot into fastboot mode and flash with command:
fastboot flash boot /path/to/magisk_patched.imgor
fastboot flash recovery /path/to/magisk_patched.imgif flashing a recovery image - Reboot and voila!
Uninstallation
The easiest way to uninstall Magisk is directly through the Magisk app. If you insist on using custom recoveries, rename the Magisk APK to uninstall.zip and flash it like any other ordinary flashable zip.
Magisk in Recovery
If your device does not have ramdisk in boot images, Magisk has no choice but to hijack the recovery partition. For these devices, you will have to reboot to recovery every time you want Magisk enabled.
Since Magisk now hijacks the recovery, there is a special mechanism for you to actually boot into recovery mode. Each device model has its own key combo to boot into recovery, as an example for Galaxy S10 it is (Power + Bixby + Volume Up). A quick search online should easily get you this info. As soon as you press the combo and the device vibrates with a splash screen, release all buttons to boot into Magisk. If you decide to boot into the actual recovery mode, long press volume up until you see the recovery screen.
As a summary, after installing Magisk in recovery (starting from power off):
- (Power up normally) → (System with NO Magisk)
- (Recovery Key Combo) → (Splash screen) → (Release all buttons) → (System with Magisk)
- (Recovery Key Combo) → (Splash screen) → (Long press volume up) → (Recovery Mode)
(Note: You CANNOT use custom recoveries to install or upgrade Magisk in this case!!)
Samsung (System-as-root)
If your Samsung device is NOT launched with Android 9.0 or higher, you are reading the wrong section.
Before Installing Magisk
- Installing Magisk WILL trip KNOX
- Installing Magisk for the first time REQUIRES a full data wipe (this is NOT counting the data wipe when unlocking bootloader). Backup your data before continue.
- Download Odin (only runs on Windows) that supports your device. You can find it easily with a quick search online.
Unlocking Bootloader
Unlocking the bootloader on modern Samsung devices have some caveats. The newly introduced VaultKeeper service will make the bootloader reject any unofficial partitions in some cirumstances.
- Allow bootloader unlocking in Developer options → OEM unlocking
- Reboot to download mode: power off your device and press the download mode key combo for your device
- Long press volume up to unlock the bootloader. This will wipe your data and automatically reboot.
- Go through the initial setup. Skip through all the steps since data will be wiped again in later steps. Connect the device to Internet during the setup.
- Enable developer options, and confirm that the OEM unlocking option exists and is grayed out. This means the
VaultKeeperservice has unleashed the bootloader. - Your bootloader now accepts unofficial images in download mode
Instructions
- Use either samfirm.js, Frija, or Samloader to download the latest firmware zip of your device directly from Samsung servers.
- Unzip the firmware and copy the
APtar file to your device. It is normally named asAP_[device_model_sw_ver].tar.md5 - Press the Install button in the Magisk card
- If your device does NOT have boot ramdisk, make sure "Recovery Mode" is checked in options.
In most cases it should already be automatically checked. - Choose "Select and Patch a File" in method, and select the
APtar file - The Magisk app will patch the whole firmware file to
[Internal Storage]/Download/magisk_patched_[random_strings].tar - Copy the patched tar file to your PC with ADB:
adb pull /sdcard/Download/magisk_patched_[random_strings].tar
DO NOT USE MTP as it is known to corrupt large files. - Reboot to download mode. Open Odin on your PC, and flash
magisk_patched.tarasAP, together withBL,CP, andCSC(NOTHOME_CSCbecause we want to wipe data) from the original firmware. This could take a while (>10 mins). - Your device should reboot automatically once Odin finished flashing. Agree to do a factory reset if asked.
- If your device does NOT have boot ramdisk, reboot to recovery now to enable Magisk (reason stated in Magisk in Recovery).
- Install the latest Magisk app and launch the app. It should show a dialog asking for additional setup. Let it do its job and the app will automatically reboot your device.
- Voila! Enjoy Magisk 😃
Upgrading the OS
Once you have rooted your Samsung device, you can no longer upgrade your Android OS through OTA. To upgrade your device's OS, you have to manually download the new firmware zip file and go through the same AP patching process written in the previous section. The only difference here is in the Odin flashing step: we do NOT use the CSC tar, but the HOME_CSC tar instead as we are performing an upgrade, not the initial install.
Important Notes
- Never, ever try to restore either
bootorrecoverypartitions back to stock! You can brick your device by doing so, and the only way to recover from this is to do a full Odin restore with data wipe. - To upgrade your device with a new firmware, NEVER directly use the stock
APtar file with reasons mentioned above. Always patchAPin the Magisk app and use that instead. - Never just flash only
AP, or else Odin may shrink your/datafilesystem size. FlashAP+BL+CP+HOME_CSCwhen upgrading.
Custom Recovery
This installation method is deprecated and is maintained with minimum effort. YOU HAVE BEEN WARNED!
It is very difficult to accurately detect the device's information in custom recovery environments. Due to this reason, installing Magisk through custom recoveries on modern devices is no longer recommended. If you face any issues, please use the Patch Image method as it is guaranteed to work 100% of the time.
- Download the Magisk APK
- Rename the
.apkfile extension to.zip, for example:Magisk-v22.0.apk→Magisk-v22.0.zip. If you have trouble renaming the file extension (like on Windows), use a file manager on Android or the one included in TWRP to rename the file. - Flash the zip just like any other ordinary flashable zip.
- Reboot and check whether the Magisk app is installed. If it isn't installed automatically, manually install the APK.
Warning: the
sepolicy.rulefile of modules may be stored in thecachepartition. DO NOT MANUALLY WIPE THECACHEPARTITION.